
Kinetic Sculpture

Introduction
The Kinetic Sculpture is a project that utilizes advanced concepts in graphic design, computer-aided design, programming, electrical engineering, mechanical engineering, manufacturing, and assembly. This project required a complex understanding of how different fields of engineering interact with each other. Some general skills learned during this project include:
- Using SolidWorks to make assemblies and sub-assemblies
- Soldering a variety of electrical components
- Machining on manual mills and lathes
- Creating six mode functions in C++
- Designing intriguing optical art
Art and Design
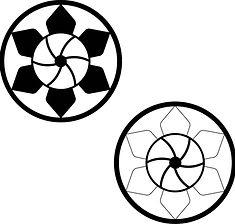
The Kinetic Sculpture discs have moire patterns that create unique optical designs when rotating. My creative process to design them involved sketching initial concepts in colored pencil and using digital tools, like Photoshop Mix and Autodesk Sketchbook, to test out various iterations (figure 1). One iteration had thin web-like patterns extending from the center with the same line thickness throughout. When I tested this design with digital applications, I found that the optical pattern was too distracting to the eye. Another iteration was themed after a flower, with open and closed petals on the two discs (figure 2). Both discs had variations in line thickness that made the radial pattern more interesting. The optical pattern was effective at using positive and negative space to interest the viewer, so this iteration became my final design.


Computer-Aided Design
After settling on my final design, I created a 3D model of the two discs in SolidWorks (figure 3). During this process, I became experienced with Configurations, Circular Pattern, Hole Wizard, and Helix and Spiral. Finalizing the discs involved altering the spoke thickness so that the actual part wouldn't break during assembly.
Then, I created sub-assemblies by referencing eDrawings. eDrawings don’t give instructions on which surfaces to mate, so there is intuition involved when recreating the assemblies. While most of the parts I used were taken from a library, I modeled all the parts in the base sub-assembly (figure 4) myself using tools like Smart Dimensions and Boss Extrude. Once the sub-assemblies were constructed into the full assembly (figure 5), I made a technical drawing (figure 6) to practice tools like Tables and Auto-Balloon.
Manufacturing and Assembly
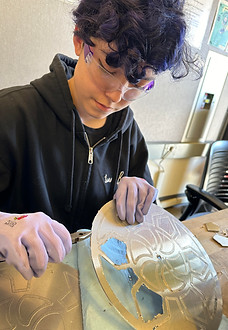
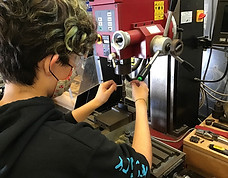
A notable part to manufacturing was deburring my discs (figure 7), which required utilizing a deburring whip. Convex curves required a slow pace and a small whip, while concave curves required a swift pace and large whip. A new manufacturing skill I learned was creating a bearing fit using a Hardinge Second Op Lathe (figure 8). I had to experiment with the right motion to use and found that a slow pace didn’t leave marks or scratches in the part. A final step to manufacturing was tapping on the mill (figure 9) to make a vertical base for the Kinetic Sculpture. The tap guide and handle were aligned vertically and had to be carefully adjusted to be precise.
A part of the assembly that didn't fit together at first was the hoop, which needed to be lined up and tightened using the proper hex key (figure 10). I had to go back and retighten the hoop with the help of a fellow student due to a gap that showed light where it wasn't supposed to. The assembly process overall involved going one step at a time to make sure all the components were in the proper place.


Electrical Engineering
Electrical components that were soldered into the circuit board include resistors, LEDs, header pins, switches, and motors. Soldering a circuit board requires creating a strong electrical connection by wetting both the lead of the component and the solder pad (the part of the board that touches the component) with a sufficient amount of solder. Components like header pins (figure 11) had leads that were close together, and it was important to make sure that solder didn’t connect any of them and change the flow of current through the circuit.
To make sure the discs don't exceed their maximum speed, each motor has a tachometer connected to the circuit (figure 12). A photodetector inside the tachometer detects light reflected off white strips on the motor's corresponding gear. The tachometer calculates the speed based off the number of pulses emitted per second and the number of times light reflects back into the photodetector.
Programming
The Kinetic Sculpture has eight modes that each produce a unique show, and they are toggled between with three switches. Two modes required accurate readings from the ultrasonic sensor. I created a function to achieve this - averageDistance() - that recorded ten measurements and returned the average value (figure 13). If there were any recorded outliers, they would be filtered from the calculations. Implementing this function meant that inaccuracies were easier to avoid.
A mode that I hadn't originally planned was mode4(), the reading light mode (figure 14). After three seconds, an average distance measurement is used to set the RBG color values of the LEDs. When this measurement is smaller, the color is brighter, and vice versa. The distance is only recorded once, and the reading light remains on until the mode is reset. mode4() utilizes a range of functions, like millis() and my own averageDistance(), and is interactive to behave the way the user wants.


Conclusion
Working on the Kinetic Sculpture prepared me to make products on a professional level. The overarching skills from each discipline came together throughout the creation of the sculpture's components, meaning each field was important for the final result. I now have the multi-disciplinary experience to recreate a high quality product in the future.